How to Properly Mount a Thermal Clip-On: A Practical Guide for Night Hunters
- Jan 13
- 3 min read
Thermal clip-on devices have become a staple of modern night hunting. They allow for positive target identification, improved situational awareness, and confident decision-making—but only if they’re mounted correctly. Mistakes in adapter selection or alignment don’t just degrade image quality; in the worst case, they can shift point of impact.
This guide walks you through the correct mounting process step by step, explains the different adapter types, and highlights what hunters absolutely need to pay attention to in the field.
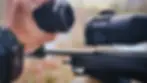
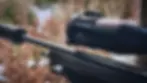
A thermal clip-on is mounted in front of the riflescope. The thermal image is displayed on the device’s internal screen, while aiming is still done through the day optic’s reticle. The riflescope itself remains zeroed.
That makes three things critical:
Coaxial alignment – the clip-on and riflescope must be perfectly centered
Repeatability – mounting and removing the unit without any shift in zero
Mechanical stability – no canting, no play, no movement under recoil
Step by Step: Getting the Mount Right
1) Measure the Objective Diameter Correctly
Measure the outside diameter of the riflescope’s objective housing—not the glass.
A deviation of as little as 0.5 mm can result in a loose fit or damaging tension.
2) Choose the Correct Adapter
The adapter is the interface between optic and clip-on. It must match the measured diameter exactly and be compatible with your specific device model.
3) Install the Adapter Without Stress
Seat it evenly—no canting
Tighten screws gradually and crosswise
Don’t overtighten—this can damage both scope and adapter
4) Mount and Lock the Clip-On
Insert the thermal device into the adapter and lock it in place. A solid, play-free fit is non-negotiable.
5) Fire a Confirmation Shot
Technically not always required—but always mandatory for hunting.
A confirmation shot builds trust in your setup and confirms responsibility in the field.
Adapter Types at a Glance

Clamp-On Adapters (Standard)
The classic solution: rugged, precise, and widely used. Ideal if you run one primary riflescope.
Pros: Excellent stability, high repeatability
Cons: Fixed diameter—multiple optics require multiple adapters
Adapters with Interchangeable Rings
A base unit with rings for different diameters.
Pros: Flexible for hunters running multiple scopes
Cons: More components; precise installation is critical
Bayonet / Quick-Detach Adapters
Designed for fast mounting and removal—popular with frequent device swaps.
Pros: Speed and convenience
Cons: Quality matters—cheap systems lose precision fast
Manufacturer-Specific Systems
Some brands offer proprietary solutions optimized for their devices, often delivering exceptional repeatability.

What Really Matters in the Field
Magnification: 1× to 4× is ideal. Higher magnification degrades image quality and sharpness.
Eye relief & sight picture: Clip-ons slightly alter the sight picture—consistent gun mount is key.
Focus tuning: Focus the thermal device first, then fine-tune the riflescope.
Clean interfaces: Keep adapter surfaces clean—dirt causes alignment shift.
Temperature & recoil: Quality adapters remain stable in cold weather and under recoil.
Common Mistakes—and How to Avoid Them
❌ Guessing the diameter
❌ Mounting the adapter off-axis
❌ Overtightening screws
❌ Skipping the confirmation shot
❌ Using cheap adapters on premium optics
Rule of thumb: A thermal clip-on is only as good as its mount.
Precision Starts Before the Shot
A properly mounted thermal clip-on isn’t a compromise—it’s an extension of your hunting awareness. With the right adapter, careful installation, and a disciplined confirmation shot, point of impact remains stable and the hunt stays safe, calm, and ethical.
Hunters who take the time to do this right gain more than technical precision—they gain confidence in their equipment and in every decision they make behind the rifle.